End of the year Facts! Facts! Facts About the Ocean! My students did an AWESOME job!
Bulletin Boards!!! Oh how I love doing them!!! The start of the school year always brings about the question.... "What will my back to school bulletin board look like this year? " With that said I thought that I would share some of the bulletin boards my class created last school year!
I Feel Warm and Toasty When.....
Tacky the Penguin Contest!!!!
Welcome to Mrs. McVey's Funtabulous First Grade!
Join me in making this a place where we can share Funtabulous ideas!
Monday, August 5, 2013
Tuesday, January 3, 2012
Let's Do Some Catching Up!! :)
The last time I had shared, I was in the process of making many changes to my classroom. I was inspired by many of you to start labeling various classroom items! After a lot of hard work, I feel very organized thanks to those of you who have shared labels, and tips for organization! I have even implemented several of my own ideas!
This is my Awesome Adjective Wall! It is made from rubber interlocking play mats! I have used Velcro to attach it to the wall in my classroom! We use push pins to post new words! I have also used a shower organizer to keep my sentence strips, scissors, and push pins nice and tidy!
This next idea came to me because I needed to have dry-erase boards available to me in different areas of my room, however, I have limited space! I simply attached two 1" x 4's to the sides of a book display shelf! I then attached a 1"x 4' across the top so that I could hang dry-erase boards on either side! Here are pictures of both sides! I then attached a metal drip pan to the bottom and back side of the book display shelf! This makes a great area for a magnetic board!
I have also purchased oil drip pans to use as magnetic boards an idea I found on Pinterest! I have lined them up underneath the ledge of my dry-erase board in my room! We use our magnetic boards often throughout the week! These work great for our I.E. (Intensive Exercise) time! We use them for word work!
Here are some other things I have been working on labeling and organizing!
The following are activities I have created and used during our I.E. time! The 5 learning components of I.E. time are phonemic awareness, phonics, vocabulary, fluency and comprehension.
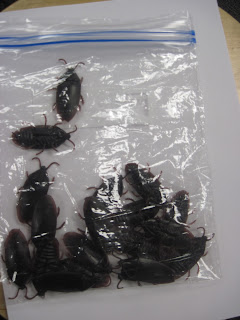
Students throw rubber bugs, attempting to get them to land on the web shaped paper plates. Each time a students' bug lands on a plate, the student flips the plate over and reads the sight word printed on the back of the plate. If the student reads the word correctly, he or she then places a marker on the plate and leaves it flipped over and face down! If the student reads the word incorrectly, the plate is returned to its' web face up position! When all of the plates have been flipped over, the student with the highest number of markers on the plates becomes the winner!
In this game students take turns throwing bean bags, attempting to land on the gumballs! When a students' bean bag lands on a gumball he or she moves to the gumball, reads the (blend, digraph or word part) printed on it, and then generates a word that begins or ends with that sound! Each time a student generates a word for the sound given the student receives a craft stick! The game continues until all gumballs have been read! The student with the most craft sticks wins the game!
My students also enjoy musical gumballs, which is played similar to musical chairs! Each time the music stops, students must find a gumball to stand on! The teacher then asks the student to read the (blend, digraph or word part) and give a word that includes the sound! If the student answers correctly he or she will earn a craft stick! If the student answers incorrectly no craft stick is given! The length of the game is based on the teacher's discretion!
This is my Awesome Adjective Wall! It is made from rubber interlocking play mats! I have used Velcro to attach it to the wall in my classroom! We use push pins to post new words! I have also used a shower organizer to keep my sentence strips, scissors, and push pins nice and tidy!
This next idea came to me because I needed to have dry-erase boards available to me in different areas of my room, however, I have limited space! I simply attached two 1" x 4's to the sides of a book display shelf! I then attached a 1"x 4' across the top so that I could hang dry-erase boards on either side! Here are pictures of both sides! I then attached a metal drip pan to the bottom and back side of the book display shelf! This makes a great area for a magnetic board!
Above is a picture of the front of the display book case/dry-erase board!
Below is a picture of the back of the display book case/dry-erase board!
This is a side view of the display bookshelf/ dry-erase board. The piece of wood used at the top made a great hanger for another shower organizer! I also used a couple of nails to work as hooks to hang my extra environmental print posters that I do not utilize daily! This way I can take them out, use them when needed and then hang them back up!
Many thanks to the person who posted this idea on Pinterest!
Here are some other things I have been working on labeling and organizing!
The following are activities I have created and used during our I.E. time! The 5 learning components of I.E. time are phonemic awareness, phonics, vocabulary, fluency and comprehension.
Webs Full of Words!
Students throw rubber bugs, attempting to get them to land on the web shaped paper plates. Each time a students' bug lands on a plate, the student flips the plate over and reads the sight word printed on the back of the plate. If the student reads the word correctly, he or she then places a marker on the plate and leaves it flipped over and face down! If the student reads the word incorrectly, the plate is returned to its' web face up position! When all of the plates have been flipped over, the student with the highest number of markers on the plates becomes the winner!
Gumball Phonics!
In this game students take turns throwing bean bags, attempting to land on the gumballs! When a students' bean bag lands on a gumball he or she moves to the gumball, reads the (blend, digraph or word part) printed on it, and then generates a word that begins or ends with that sound! Each time a student generates a word for the sound given the student receives a craft stick! The game continues until all gumballs have been read! The student with the most craft sticks wins the game!
My students also enjoy musical gumballs, which is played similar to musical chairs! Each time the music stops, students must find a gumball to stand on! The teacher then asks the student to read the (blend, digraph or word part) and give a word that includes the sound! If the student answers correctly he or she will earn a craft stick! If the student answers incorrectly no craft stick is given! The length of the game is based on the teacher's discretion!
Fill the Stockings!
At the beginning of the game students are each given a bag of markers. Each student should be given a different color. Students take turns tossing their markers onto each stocking! When a students' marker lands on a stocking, he or she reads the word to the teacher. If the student reads the word correctly he or she leaves one of his or her markers on the stocking! After each student has attempted to read each stocking the game will come to an end. The student who has filled the most stockings with his or her markers wins the game!
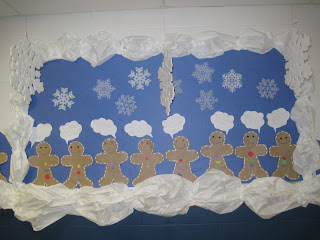
Here is our most recent bulletin board!
Gingerbread Man Graphing
What part did you eat first? A different way to graph!
I hope you have enjoyed some of the things I have shared! Thanks to each of you for inspiring me daily!
Monday, January 2, 2012
Happy New Year!
Happy New Year! I have enjoyed sharing ideas with each of you! I look forward to more learning and sharing in 2012!
Saturday, September 10, 2011
Making Changes....and Sharing Ideas!
My room....a view from the door!
Group Work Tubs & Math Manipulative Tubs
I hope to label this week!
I've been working on my classroom library, organizing and labeling, I still have many things left to do and label! Many thanks to
http://keenonkindergarten.blogspot.com & http://hill.troy.k12.mi.us for the labels!
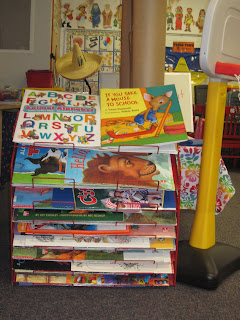
A poster rack (used in stores) makes a great "big book" holder! I purchased this at a yard sale for $7.00!
Word Wall to the Rescue! About 10 years ago I decided I was tired of picking up word wall words off of the floor! This is a quick and easy fix! Simply take the alphabet header cards and staple or hot glue a ribbon to each, then place stick on Velcro every 3-4 inches along the ribbon, next place a piece of Velcro on the back side of each word wall word, last take a hole punch and punch a hole in the top of the alphabet header card, then use a large paper clip to serve as the hanger, place the paper clip hanger in the track of your ceiling tiles of your classroom and you are done!
Word Wall!
More leveled readers to organize and label!
I have several other areas in my library that I will be working on this week! I feel inspired by so many of you to make my library an organized and fun place to spend time! It feels so awesome to be able find the book I need, right when I need it, and direct my students to books I know they will be able to read and enjoy with ease!
Word families! Just another pipe cleaner, alphabet bead and index card idea!
Spin and read! Color spinner, color word tiles, one bowl per child and one bowl labeled "I don't know!" Students must choose a word tile that matches the color they have spun on the spinner and read the word. If the student reads the word correctly, they may place the word tile in their bowl. If the student reads the word incorrectly he/she must place it in the “I don’t know!” bowl. As word tiles start to accumulate in the “I don’t know!” bowl, they become extra point words! If a student should read the word they have chosen correctly, they may also choose a word tile from the “I don’t know!” bowl that matches the color they have spun. If they read this word correctly, they may keep it as well! The student, who has the most word tiles, wins the game! Once the winner has been determined, students try to make sentences using only the words in their bowls! I also choose a winner for the best sentence made from the word tiles!
Word Families....foam sheets and card stock strips!
I had problems with a couple of pictures not wanting to rotate! I apologize....very annoying! :)
I have created 37 poetry power points for our first grade Poetry for Breakfast. Every grade participates in Poetry for Breakfast and each grade level has implemented the program in their own way! Each week I introduce a new poem. I have created a slide for each day of the school week. Each slide focuses on a language arts skill. I had a lot of fun creating these power points. Someday I hope to attach a link so that I can share all of them with those of you who are interested!
Slide 2.... for Tuesday, highlighted rhyming words.
Below...students compare their answers to slide 2 of the poetry power point. Tip: Having a presentation pointer allows you to be anywhere in the room and change the slides! I love mine! I can sit with a small group in the back of the room and change the slides when students are ready to move on to the next skill!
Something you may not know...clear page protector sleeves make great dry erase boards for things you want to reuse! Each week a classroom helper changes the poems in the sleeves!
We use this pocket chart to display the things we've learned from the poem of the week! By the end of the week the pocket chart is full of (rhyming words, nouns, pronouns, verbs, contractions, adjectives, word parts/chunks etc.) You get the idea!
Butterfly labeling and following directions!
Okay...so once again I realize this picture needs to be rotated, but it would not cooperate! LOL!
Well that's all for now.....have a wonderful weekend!
Stephanie McVey
Sunday, August 28, 2011
Begin with the End in Mind!
Begin with the End in Mind! I have decided to share pictures from last year! For the past 4 years I have held a Family Day Luau at the end of the school year! The Family Day Luau is held in honor of Mother's Day and Father's Day! It is truly a fun time for everyone!
Fishing for Contractions!!!
First Grade Fishing for Contractions! Supplies needed: Blue bulletin board paper, dowel rods, drill, fishing line, small round magnets, baskets, foam sheets, a permanent marker and large paper clips! Drill small holes at the end of each dowel rod, drill one small hole through the center of the magnet, slip the fishing line through the hole in the dowel rod and tie it off, next slip the fishing line through the magnet and tie it off with a knot at the bottom, cut fish patterns out of colored foam, write a contraction on each fish, be sure to write the matching word pair on the same color fish as its matching contraction, last, attach a paper clip to the mouth of each fish! As students find matches they should place them in their baskets or buckets!
Ocean in a bottle! Tub of white sand, funnel, bottled water (labels removed, names printed on each), blue food coloring (2 drops! Adults only!), small seashells, glitter, glass beads and small rubber fish!
Personalized visors! Preparations: find each students' Hawaiian translated name, name cards with name and Hawaiian name printed on each, permanent markers, and beach theme foam stickers!
The Tikki Snack Shack in the background of the picture above served as our snack station! We had cupcakes, fruit kabobs, and Island Ice drinks! Our fifth grade Poetry Pals pictured below, came to work at the Tikki Shack and helped to serve our guests!
Family Day Banners/Flags! Scrap booking paper, hole punchers, ribbon, paint and paint brushes! Each family member placed their hand print on the banner and then signed their name below their hand prints! Students and family members decorated the banners when they were finished!
Photo frame centers! We made and decorated family day photo frames to display the pictures taken in our photo booth!
We also attempted to learn how to hula, by watching the DVD Hula for Children! It was awesome to see the parents join in and dance! It was especially funny to watch the dads trying to hula!
This is one of my absolute favorite and fun-ta-bulous first grade events! I look forward to it each year and get excited when I find new ideas to incorporate into this special day! I have found so many awesome ideas on Pinterest for my Family Day Luau and well, just about everything! I'm eager to learn from and share with each of you! Have a wonderful school year! Stephanie McVey
P.S. As I mentioned in my first post, this is my first blog....it took me an entire day to get my Pinterest button to work, 2 days to make and attach my slide show, and as of this evening I have now figured out how to display the blogs I have been following and add pictures to my posts! WOO! HOO for ME! LOL! I thought I knew quite a bit about computers, but I guess I was wrong!
Subscribe to:
Posts
(
Atom
)


